Looking for a quick, easy, and delicious weeknight dinner? This air fryer parmesan crusted chicken recipe delivers crispy, golden perfection without the mess and excess oil of traditional frying. The air fryer creates a wonderfully crunchy parmesan crust while keeping the chicken tender and juicy inside. Perfect for busy weeknights or when you’re craving restaurant-quality chicken without the guilt, this recipe will quickly become a family favorite. Even better, it’s ready in under 30 minutes from start to finish!
What You’ll Need for Air Fryer Parmesan Crusted Chicken
INGREDIENTS
For the Chicken:
- 4 boneless, skinless chicken breasts (about 6-8 oz each)
- 2 tablespoons olive oil
- 2 large eggs
- 1 tablespoon water
- 1 teaspoon garlic powder
- 1 teaspoon Italian seasoning
- 1/2 teaspoon paprika
- 1/2 teaspoon salt
- 1/4 teaspoon black pepper
For the Parmesan Crust:
- 1 cup grated parmesan cheese (fresh is best but pre-grated works too)
- 3/4 cup panko breadcrumbs
- 1/4 cup regular breadcrumbs
- 2 teaspoons dried parsley
- 1 teaspoon garlic powder
- 1/2 teaspoon onion powder
EQUIPMENT NEEDED
- Air fryer
- Meat mallet or rolling pin
- 3 shallow bowls or plates for breading station
- Measuring cups and spoons
- Paper towels
- Cooking spray (preferably olive oil spray)
- Instant-read meat thermometer
Recipe Overview
- Prep Time: 10 minutes
- Cook Time: 15 minutes
- Total Time: 25 minutes
- Servings: 4
- Difficulty: Easy
Can You Use Frozen Chicken in This Recipe?
While this recipe is best with fresh chicken, you might be wondering about baking frozen chicken thighs or breasts instead. Yes, you can use frozen chicken, but you’ll need to adjust the cooking process. For the best results, I recommend thawing your chicken completely before applying the parmesan crust.
However, if you’re in a pinch, you can cook this recipe starting with frozen chicken. Here’s how to adapt the recipe:
Instructions
step 1
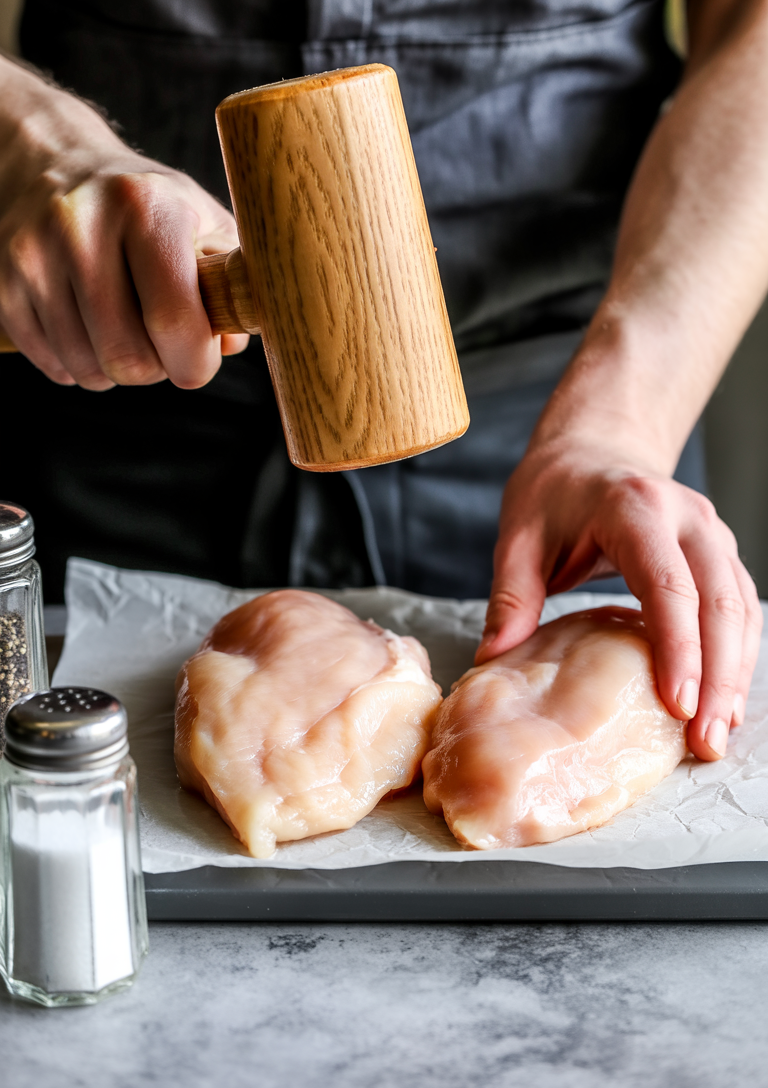
Begin by removing the chicken breasts from the refrigerator and placing them on a clean cutting board. Pat each breast completely dry using paper towels, ensuring you remove all surface moisture – this is crucial for achieving maximum crispiness in the air fryer.
Next, examine the thickness of your chicken breasts. If they’re uneven or thicker than ½ inch, place them between two sheets of plastic wrap or parchment paper. Using a meat mallet or rolling pin, gently pound them to create an even ½-inch thickness throughout. This uniform thickness ensures the chicken cooks evenly and prevents some areas from drying out while others remain undercooked.
Once properly prepared, season both sides of each breast with a generous pinch of salt and black pepper, gently pressing the seasoning into the meat. Let the seasoned chicken rest at room temperature for 5-10 minutes while you prepare the coating mixture.
step 2
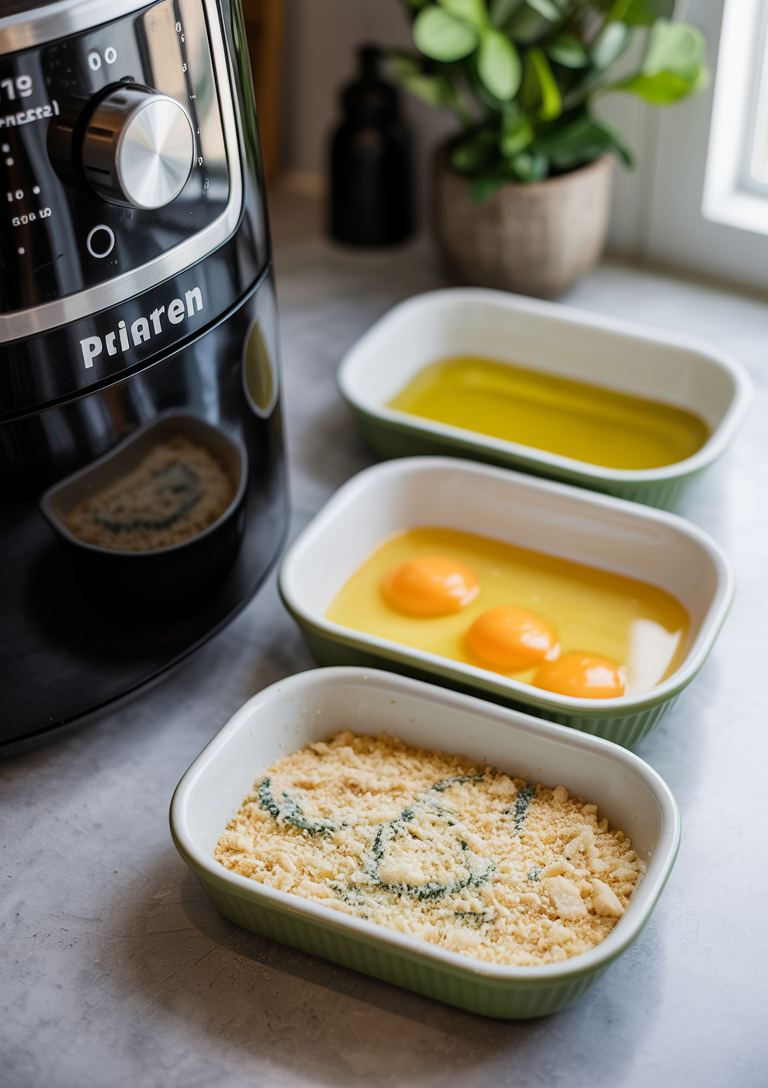
Set up your breading station with three shallow dishes arranged in a line for easy assembly. In the first dish, pour the olive oil. In the second dish, whisk together:
- Eggs
- Water
- Garlic powder
- Italian seasoning
- Paprika
- Salt and pepper
Whisk until well combined and the mixture is smooth. In the third dish, combine:
- Parmesan cheese
- Both types of breadcrumbs
- Dried parsley
- Garlic powder
- Onion powder
Mix the dry ingredients thoroughly to ensure even distribution of flavors throughout the coating. This three-station setup will create a smooth workflow for coating your chicken pieces efficiently.
step 3
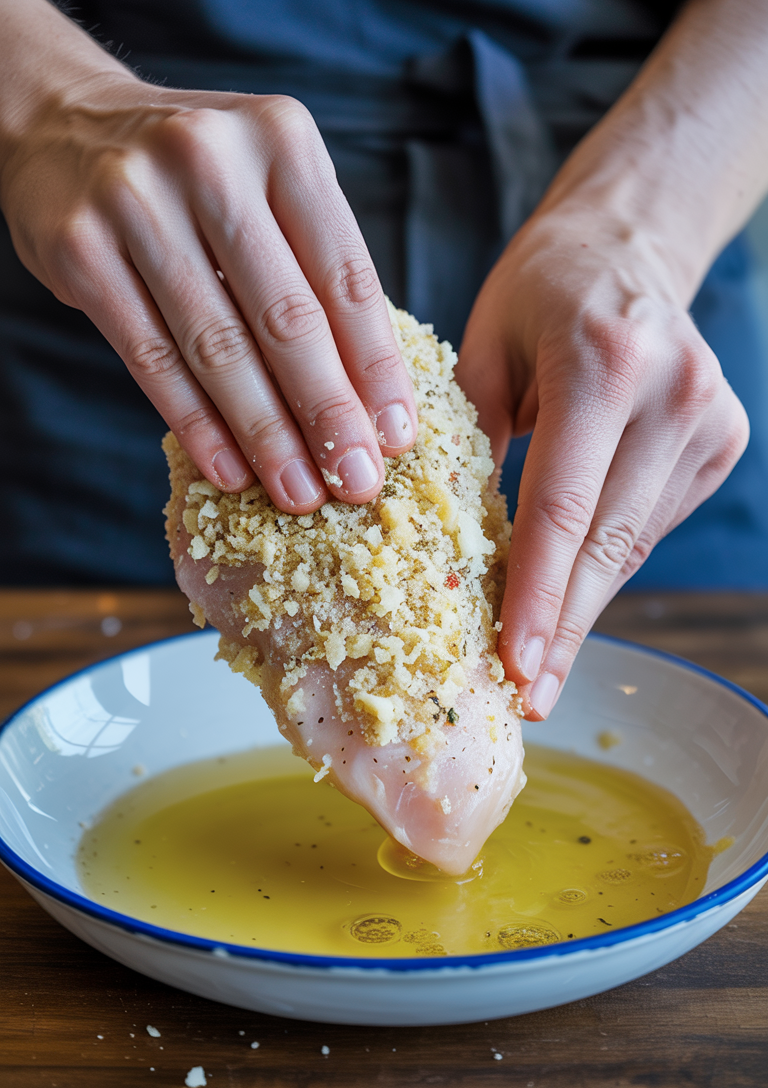
Working with one chicken breast at a time, dip each piece first in the olive oil, coating lightly on both sides to help the subsequent layers adhere properly. Next, dip the oiled chicken into the beaten egg mixture, ensuring it’s completely coated and any excess drips off.
For the final coating, press the chicken firmly into the parmesan breadcrumb mixture. Make sure to coat both sides and all edges thoroughly, pressing the mixture into the surface of the meat. Apply firm pressure to help the breadcrumbs stick—this step is crucial for achieving that coveted crispy exterior.
Pro tip: For extra crispiness, don’t just sprinkle the breadcrumbs on top. Instead, press them firmly onto the chicken with your hands or the back of a spoon, creating an even, compact layer that will crisp up beautifully in the air fryer.
step 4
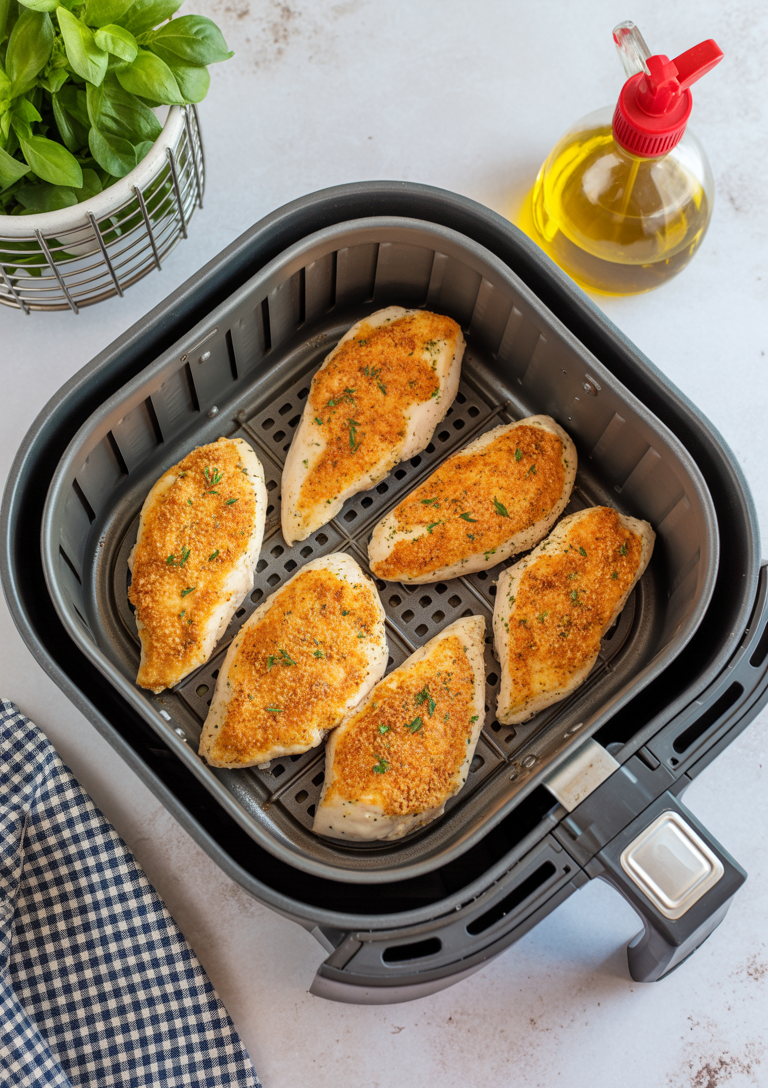
Preheat and prepare your air fryer by setting it to 380°F (190°C) and allowing it to heat for 3 minutes. While it’s warming up, lightly spray the air fryer basket with cooking spray to prevent sticking.
Arrange the breaded chicken in the air fryer basket in a single layer, ensuring the pieces don’t overlap or touch. This allows hot air to circulate evenly around each piece for optimal cooking. Note: Depending on your air fryer size, you may need to cook the chicken in batches.
Apply final spray by lightly misting the top of each chicken breast with cooking spray. This extra step will help achieve that coveted golden, crispy exterior that makes air fryer chicken so irresistible.
step 5
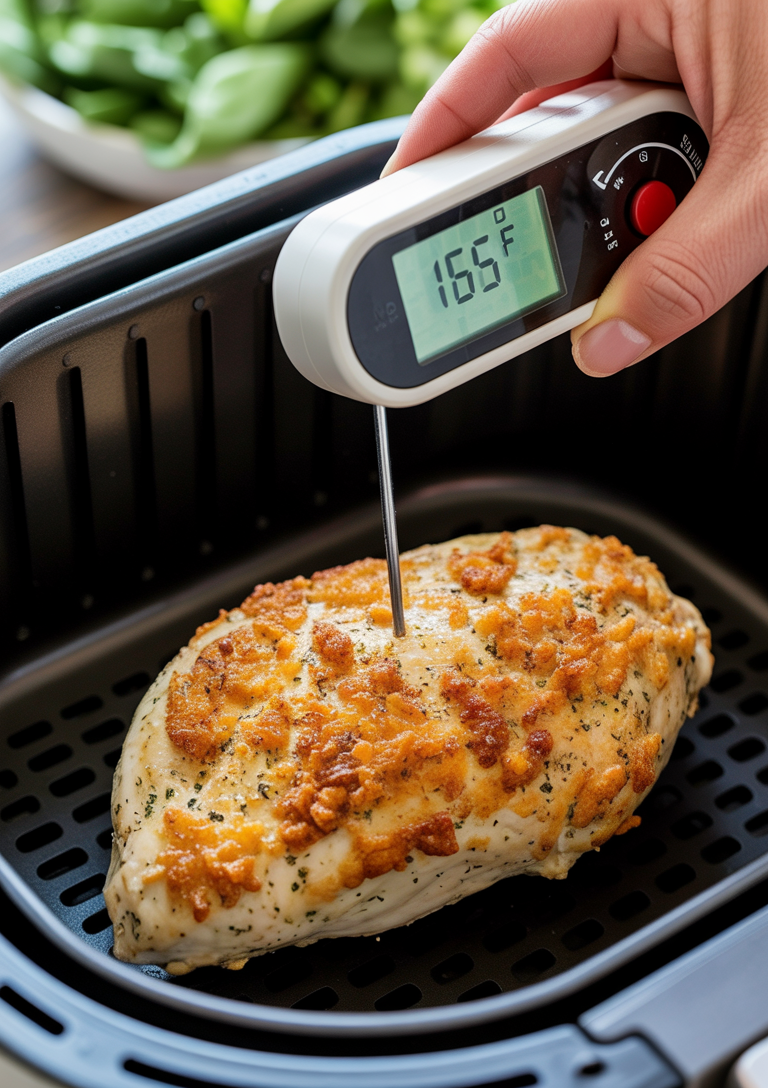
Cook the chicken in the air fryer at 380°F for 7-8 minutes. Once the initial cooking time is complete, carefully flip the chicken breasts over using tongs to avoid damaging the parmesan crust. Lightly spray the flipped side with cooking spray to ensure even browning and crispiness.
Continue cooking for another 7-8 minutes until the exterior becomes golden brown and deliciously crispy. The chicken is properly cooked when:
- The internal temperature reaches 165°F (74°C) when checked with a meat thermometer
- The parmesan crust appears golden brown and crispy
- Juices run clear when the thickest part is pierced
Pro tip: Insert the meat thermometer into the thickest part of the breast to get an accurate reading. If the chicken needs more time, continue cooking in 2-3 minute intervals until it reaches the safe internal temperature.
step 6
Remove the chicken from the air fryer and let it rest for 3-5 minutes before serving. This crucial resting period allows the juices to redistribute throughout the meat, ensuring each bite remains tender and flavorful.
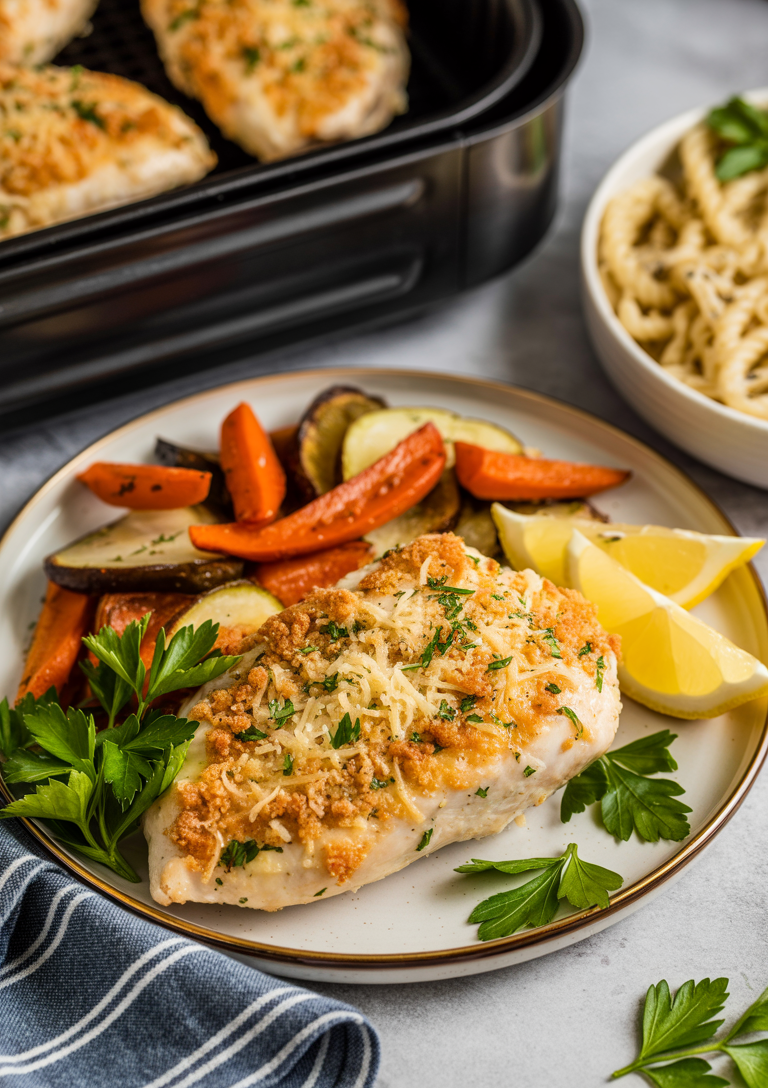
Serve the crispy Parmesan crusted chicken hot alongside your favorite accompaniments:
- Roasted vegetables such as asparagus, Brussels sprouts, or carrots
- Fresh salad with mixed greens and a light vinaigrette
- Pasta tossed with olive oil and herbs
- Rice pilaf or garlic mashed potatoes
For an elegant finishing touch, garnish with fresh chopped parsley and serve with lemon wedges on the side. The bright citrus complements the rich Parmesan crust beautifully and adds a refreshing contrast to the savory flavors.
Tips for Working with Frozen Chicken
Baking Frozen Chicken Thighs
If you want to use frozen chicken thighs instead of breasts for this recipe:
- Add 50% more cooking time (approximately 22-25 minutes total)
- Start by cooking the frozen thighs for 10 minutes at 380°F
- Remove from the air fryer, quickly coat with the egg mixture and parmesan breading
- Return to the air fryer and continue cooking until crispy and internal temperature reaches 165°F
Keep in mind that the coating may not adhere as well to partially thawed chicken, and the texture won’t be quite as perfect as using fresh chicken. For the absolute best results, thaw your chicken completely before proceeding with the recipe.
Why Use an Air Fryer for Parmesan Crusted Chicken?
The air fryer is the perfect tool for making parmesan crusted chicken because:
- It creates an incredibly crispy exterior without deep frying
- The chicken stays juicy and tender inside
- Cooking time is quick – about 15 minutes
- You use significantly less oil than traditional frying
- No need to heat up your whole kitchen by using the oven
- Clean-up is minimal compared to pan-frying
The hot circulating air in the air fryer creates a perfectly golden, crunchy parmesan crust while sealing in the chicken’s natural juices. It’s like having the best of both worlds – crispy exterior and juicy interior!