Indulge in the rich, creamy goodness of this carnivore cheesecake recipe that perfectly aligns with your meat-based lifestyle. This zero-carb, sugar-free dessert satisfies your sweet tooth without compromising your carnivore diet principles. Made primarily with animal-based ingredients, this cheesecake delivers a luxurious texture and flavor that rivals traditional versions. Whether you’re following a strict carnivore regimen or simply looking for a high-protein, low-carb treat, this simple cheesecake recipe will become your go-to indulgence for special occasions or whenever cravings strike.
The Ultimate Carnivore Cheesecake Recipe
Overview
- Prep Time: 15 minutes
- Cook Time: 40 minutes
- Cooling Time: 4 hours minimum (preferably overnight)
- Total Time: 4 hours 55 minutes (plus overnight chilling)
- Servings: 8 slices
- Difficulty: Medium
Why This Rich Cheesecake Recipe Works on a Carnivore Diet
Traditional cheesecake typically contains sugar, flour, and other plant-based ingredients that don’t align with the carnivore lifestyle. This innovative recipe transforms the classic dessert into a carnivore-friendly treat by eliminating all plant products and relying solely on animal-derived ingredients.
The high fat content from the cream cheese and eggs creates that signature creamy texture we all love in a good cheesecake, while a touch of natural animal-based sweetness satisfies your dessert cravings without derailing your diet principles.
Ingredients for This Cream Cheese Dessert
For the Filling:
- 24 oz (680g) full-fat cream cheese, room temperature
- 4 large eggs, room temperature
- 2 egg yolks, room temperature
- 1/2 cup (120ml) heavy cream
- 1 tablespoon vanilla extract (optional for strict carnivore, but adds flavor)
- 2-3 tablespoons honey (optional for more relaxed carnivore approach)
- Pinch of salt
For the Optional “Crust”:
- 4 oz (113g) pork rinds, finely crushed
- 3 tablespoons unsalted butter, melted
EQUIPMENT NEEDED
- 9-inch springform pan
- Parchment paper
- Large mixing bowl
- Electric mixer (stand or handheld)
- Measuring cups and spoons
- Rubber spatula
- Roasting pan (for water bath method)
- Aluminum foil
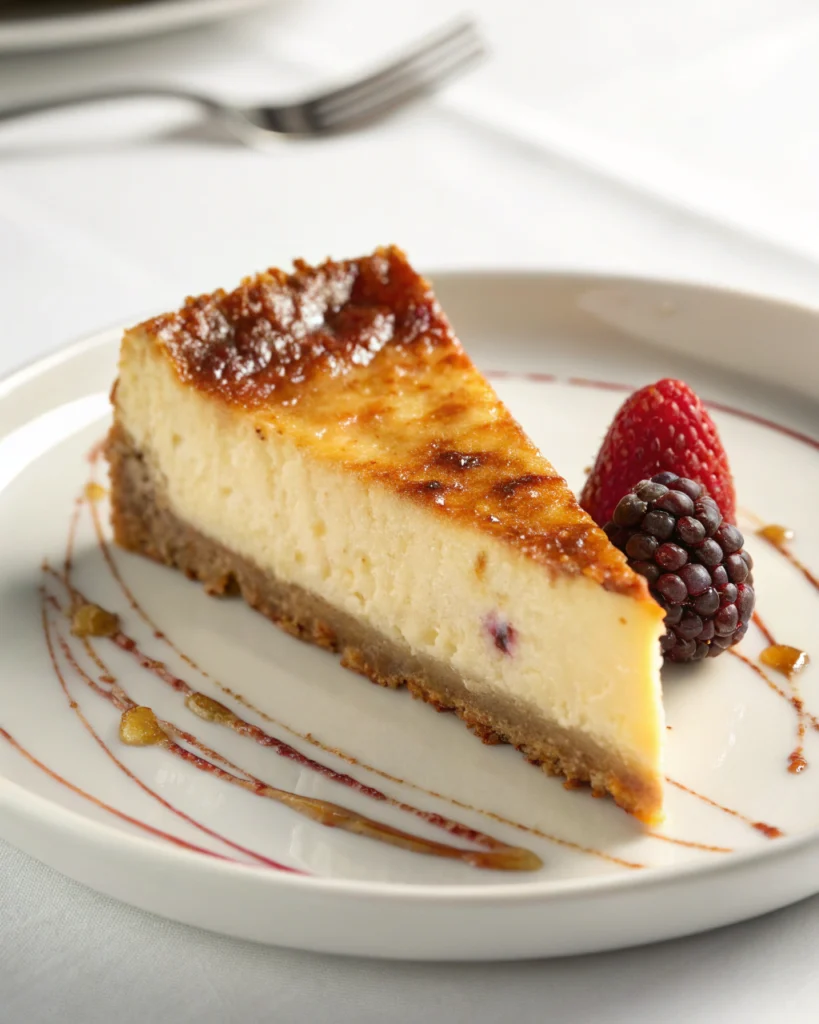
Sugar-Free Cheesecake: Nutritional Information
Per slice (1/8 of cheesecake, no optional honey):
- Calories: 385
- Protein: 12g
- Fat: 36g
- Total Carbs: 2g
- Fiber: 0g
- Net Carbs: 2g
This high protein cheesecake is perfect for those on a carnivore or keto diet, as it provides substantial fat and protein with minimal carbohydrates.
Step 1: Prepare Your Pan and Crust
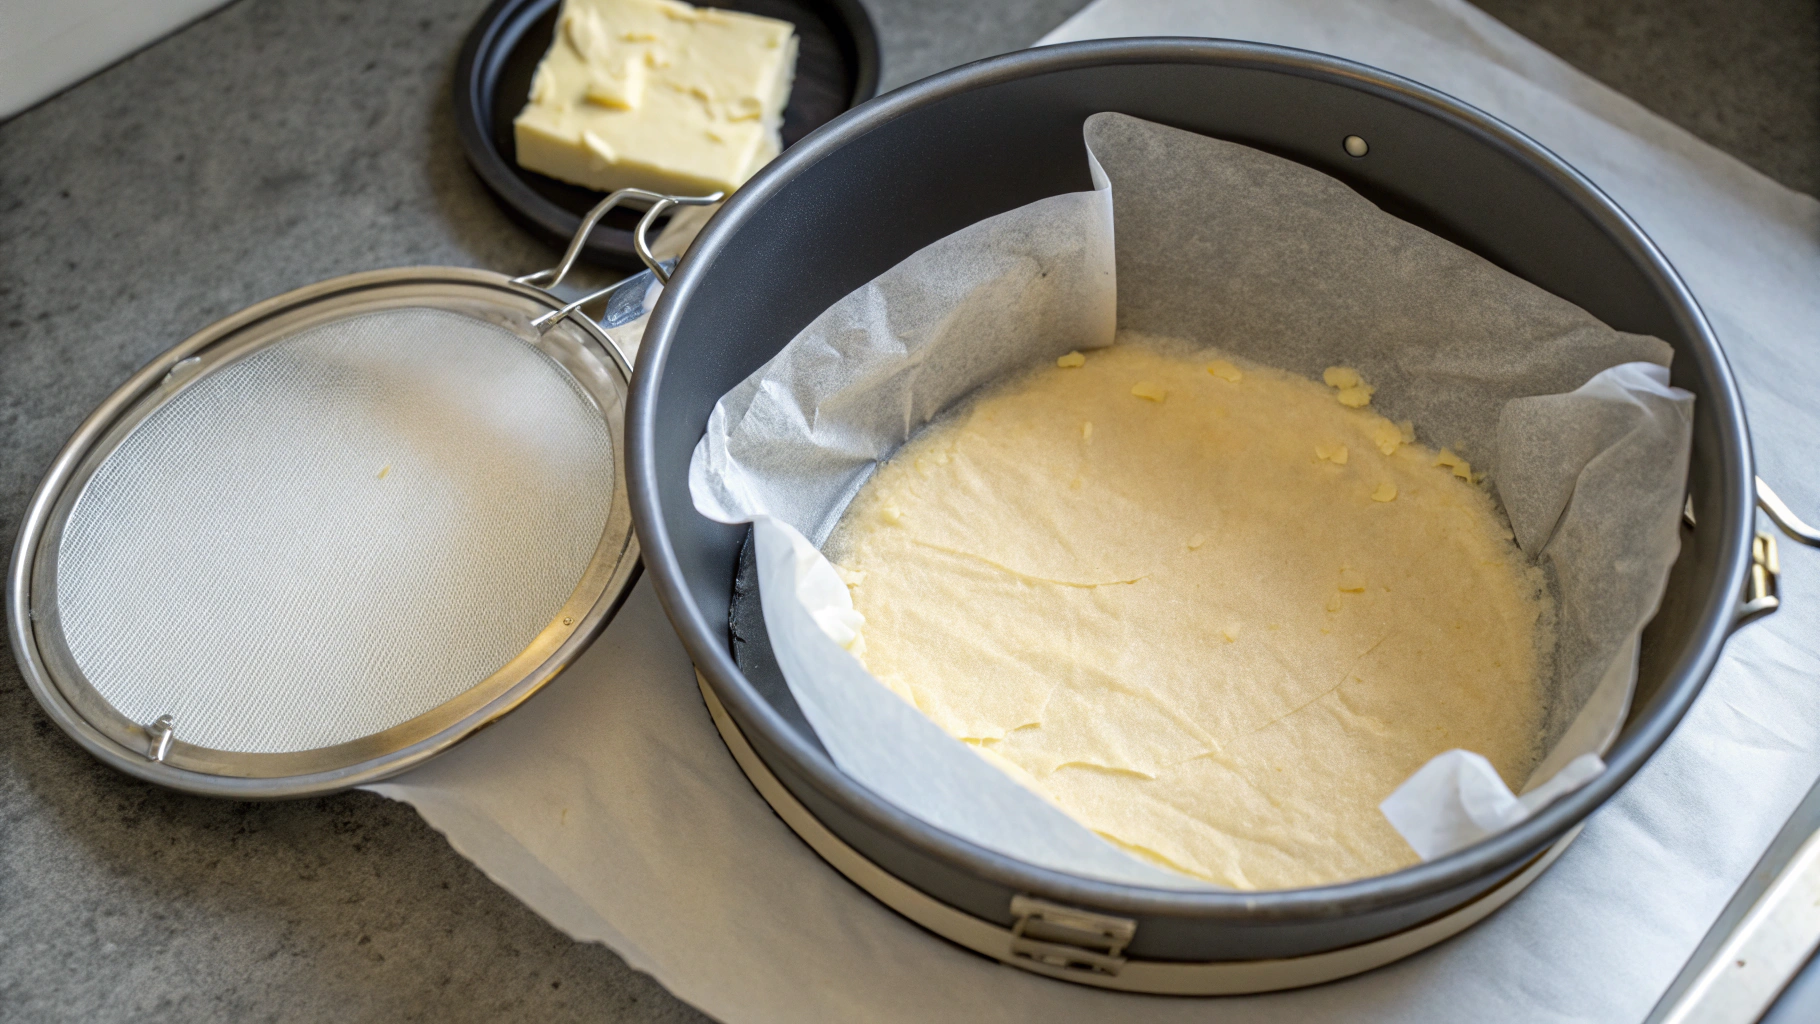
Preheat your oven to 325°F (165°C) and begin by preparing your springform pan. Line the bottom with parchment paper and generously grease the sides with butter to ensure easy removal later.
For the optional pork rind crust:
- Combine crushed pork rinds with melted butter in a bowl, stirring until the mixture resembles wet sand
- Press the mixture firmly and evenly across the bottom of your prepared springform pan
- Place the pan in the refrigerator while you work on the filling
Pro tip: For an extra crispy crust that perfectly complements the creamy cheesecake, pre-bake the crust for 10 minutes, then allow it to cool completely before adding your filling. This simple extra step creates a delightful textural contrast that elevates this carnivore-friendly dessert.
Step 2
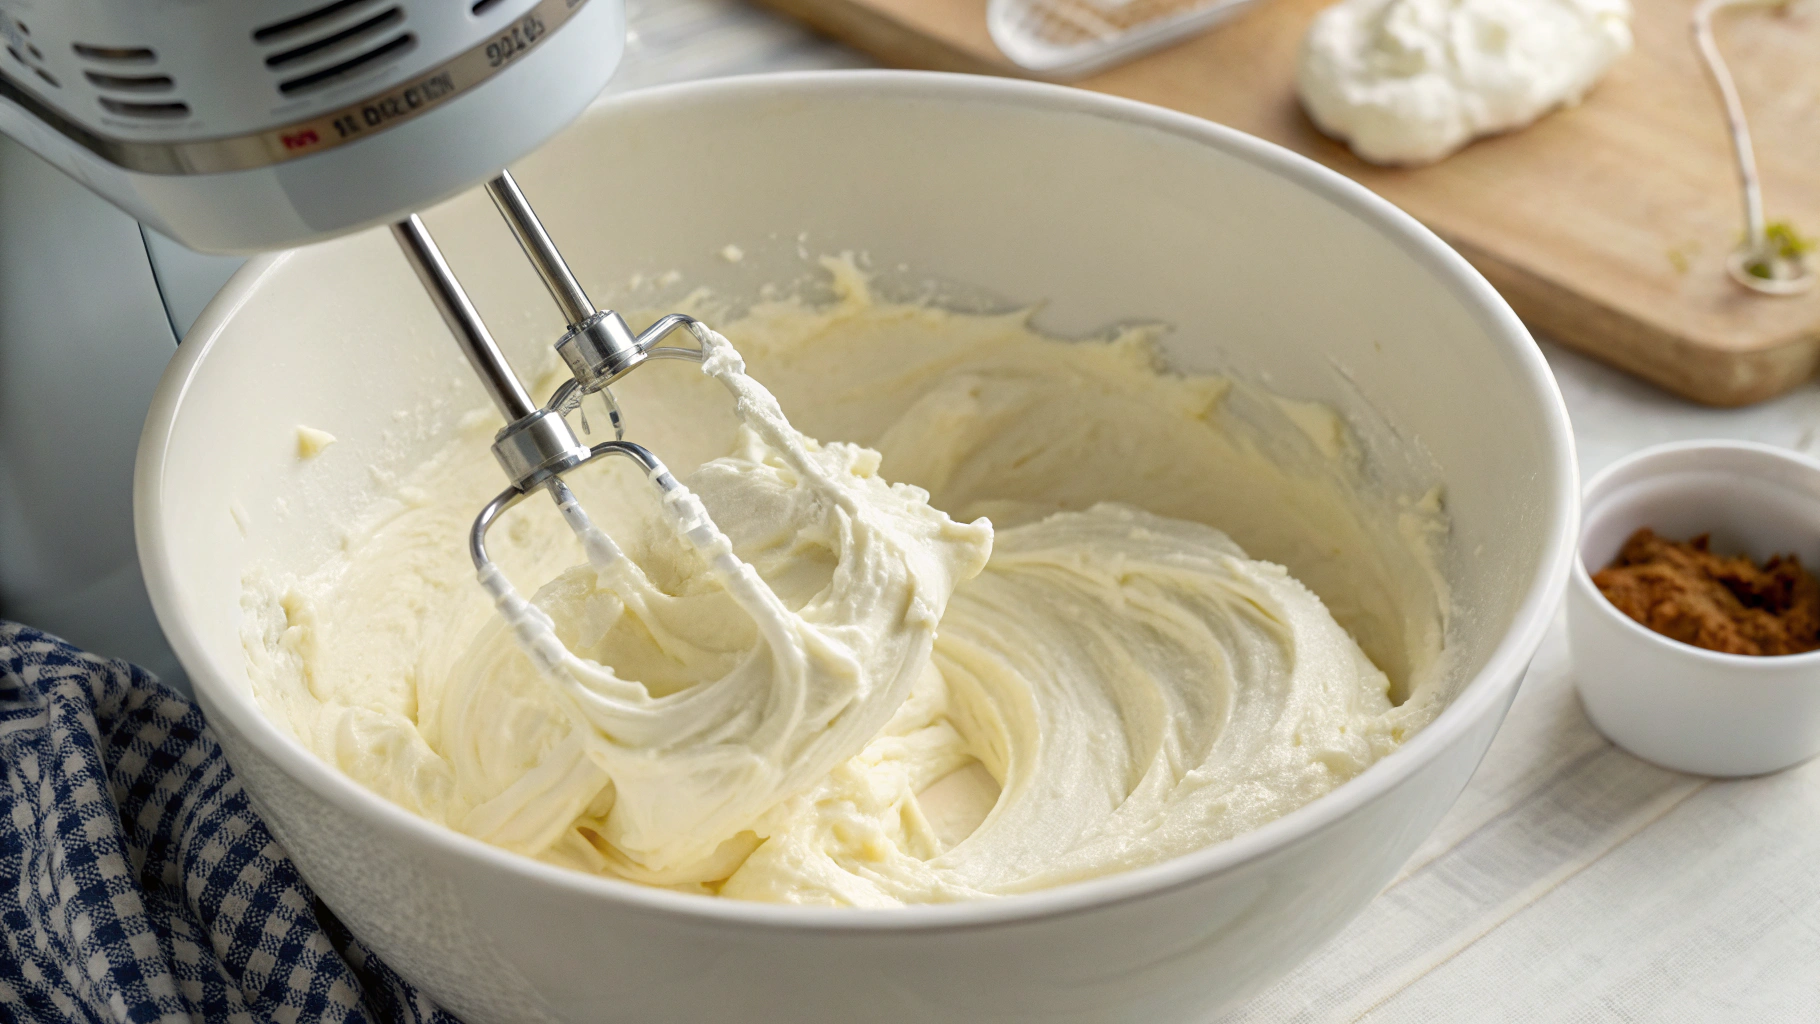
Beat the Cream Cheese Until Perfectly Smooth
In a large mixing bowl, beat the cream cheese on medium-low speed until completely smooth and free of lumps, about 2-3 minutes. Scrape down the sides of the bowl frequently.
Pro Tip: Room temperature cream cheese is essential for a smooth texture. Cold cream cheese will remain lumpy no matter how long you beat it. If you forgot to take it out ahead of time, unwrap it and microwave in 10-second intervals, turning the block between each interval, until just softened but not melted.
Ensure you’re using full-fat cream cheese for this carnivore-friendly recipe, as it provides the richest flavor and best texture. The patient beating process now will reward you with a silky-smooth cheesecake later, free from those unpleasant lumps that can ruin the eating experience.
Step 3: Add Eggs With Precision

Adding the eggs correctly is crucial for your carnivore cheesecake’s texture.
With your mixer on low speed, add each whole egg and egg yolk one at a time. The key here is patience—after adding each egg, beat just until it disappears into the batter before adding the next one.
Why this matters: Over-mixing at this stage incorporates too much air into your batter, which can lead to the dreaded cracks during baking and cooling. Your goal is a dense, rich cheesecake—not a soufflé!
Pro tip: Always crack each egg into a separate small bowl first, then add it to your mixture. This extra step prevents shell fragments from ruining your entire batch of precious carnivore-friendly batter.
The batter should look smooth and slightly thickened after incorporating all eggs. It will still be pourable but with a silky consistency that coats the back of a spoon.
Step 4: Add Cream & Seasonings

Pour in the heavy cream and add salt (and optional vanilla or honey if using). Beat on low speed just until combined and smooth. The mixture should be thick but pourable.
With your cheese mixture now properly softened, it’s time to add the remaining ingredients that will give your carnivore cheesecake its luxurious texture. Pour the heavy cream slowly into the bowl while mixing at low speed. This gradual incorporation prevents splashing and ensures even distribution.
Add a pinch of sea salt, which enhances the natural flavors of the cheese without making the cheesecake taste salty. The salt actually works to amplify the richness of the fats.
🥩 Carnivore Tip: For a strictly carnivore version, omit the vanilla and honey. For those allowing minimal non-carnivore ingredients, these add wonderful flavor depth.
If you’re using vanilla extract, add just 1-2 teaspoons – a little goes a long way. For honey, consider 1-2 tablespoons depending on your desired sweetness level.
Continue beating until just combined – overbeating at this stage can incorporate too much air and lead to cracks during baking. The final consistency should be thick and creamy but still able to be poured into your prepared crust. The mixture should coat the back of a spoon and slowly drip off rather than run freely.
Step 5: Prepare the Water Bath
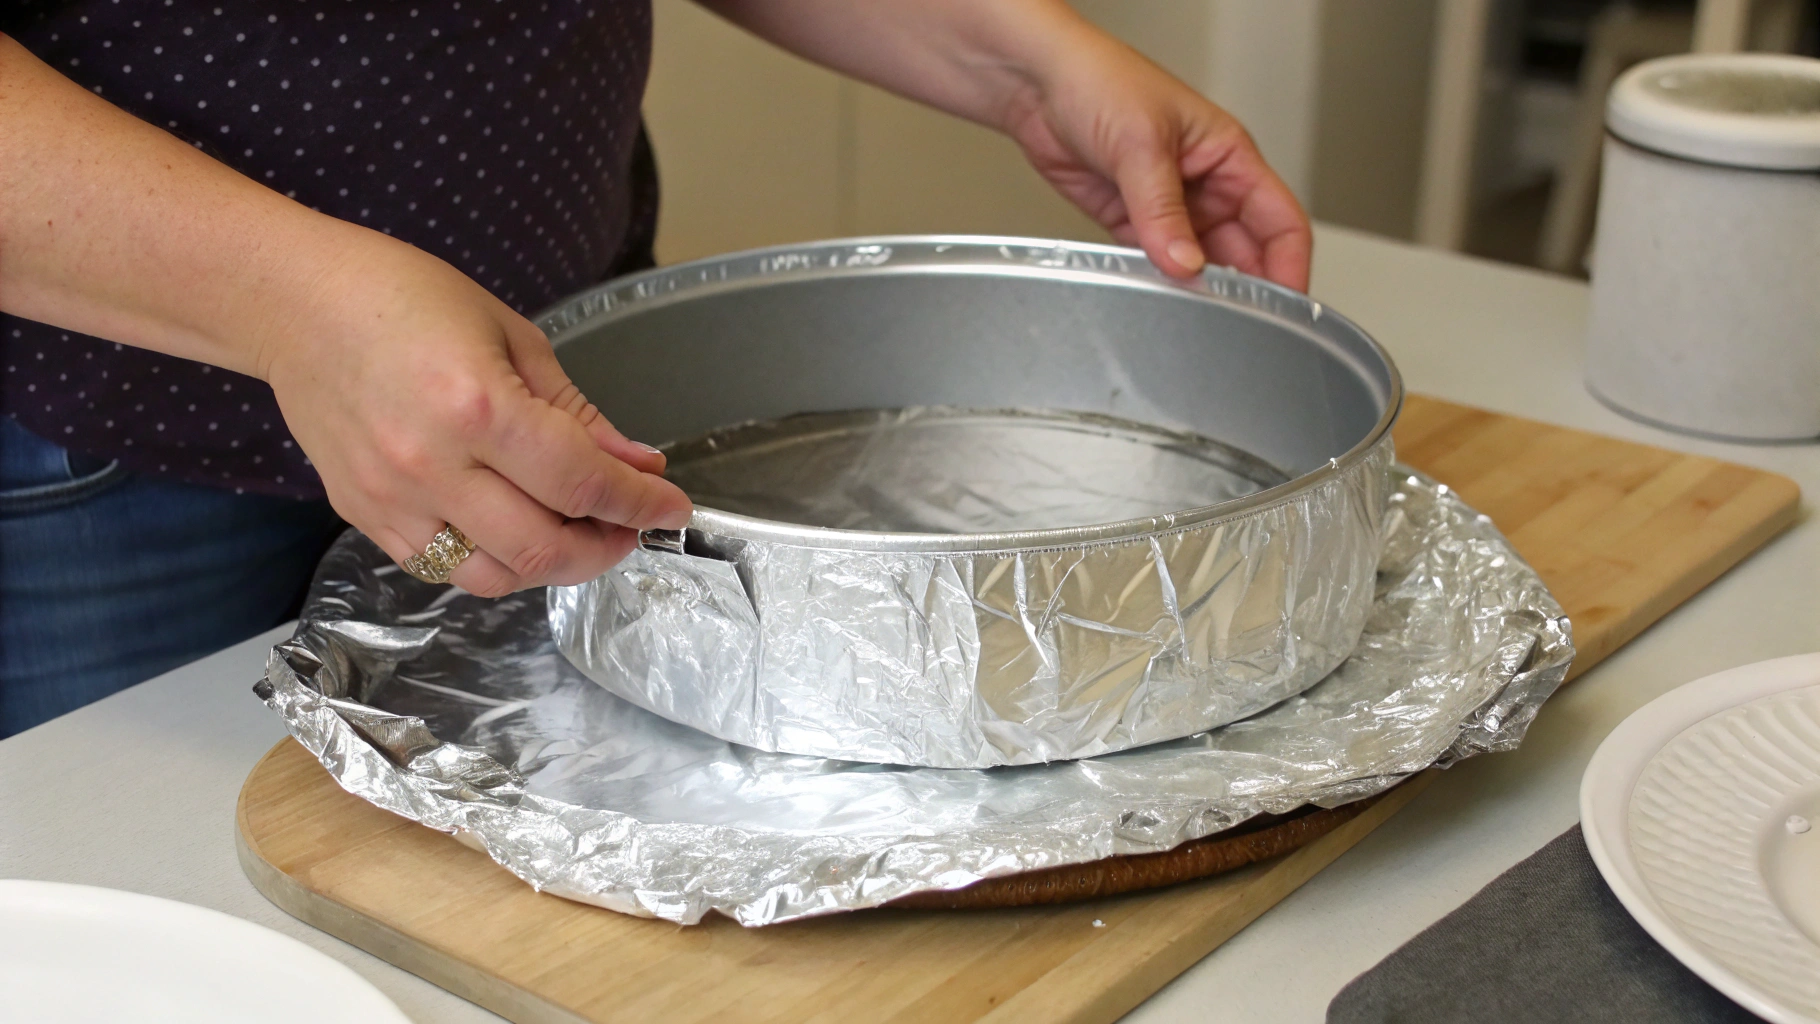
Create a Waterproof Barrier
A water bath is essential for achieving that perfectly smooth, crack-free cheesecake texture. Take your springform pan containing the crust and carefully wrap the outside with heavy-duty aluminum foil. The foil should completely cover the bottom and extend all the way up the sides of the pan. Examine the foil carefully to ensure there are no tears, holes, or gaps where water could seep in.
Pro tip: For the best protection against water leakage, use extra-large, heavy-duty foil and create a double layer by wrapping the pan twice. This added insurance will protect your keto carnivore cheesecake from becoming waterlogged, which would ruin both the texture and flavor of your dessert.
The water bath will create a gentle, humid environment around your cheesecake as it bakes, allowing for even heat distribution and preventing the top from drying out too quickly—crucial for achieving that signature creamy, decadent texture that makes this sugar-free treat so satisfying.
Step 6
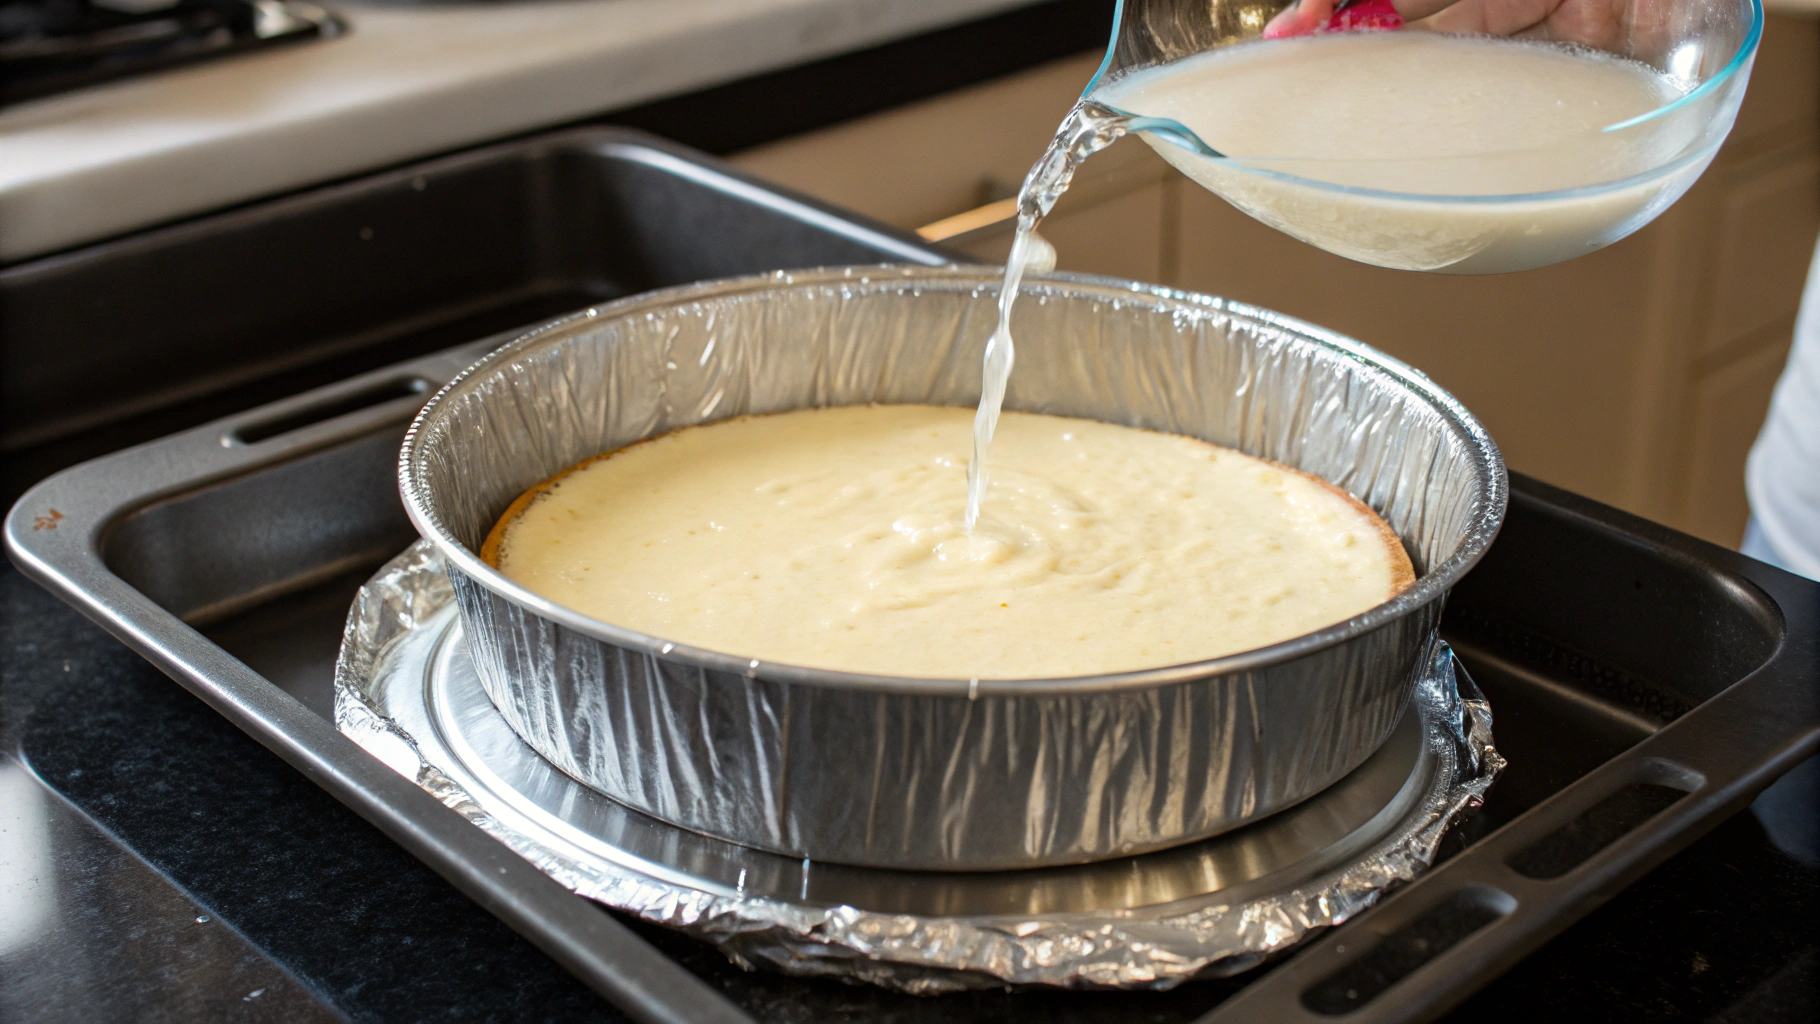
Step 6: Create a Water Bath and Add Your Batter
It’s time to bring your cheesecake to life! Gently pour your smooth, velvety batter into the prepared springform pan, using a spatula to evenly distribute and smooth the top surface to perfection.
Setting up the water bath:
- Place your wrapped springform pan (with the crust and batter) in a larger roasting pan
- Carefully add hot water to the roasting pan until it reaches halfway up the sides of the springform pan
Pro Tip: For a clean, splash-free experience, position the empty roasting pan with your cheesecake in the oven first, then pour the hot water into the roasting pan. This technique prevents water from splashing onto your cheesecake or creating a slippery mess on your kitchen floor.
The water bath provides gentle, even heat that’s essential for creating that perfectly creamy, crack-free texture that makes a carnivore cheesecake so irresistibly decadent. The steam from the water helps to maintain moisture in the oven, preventing the surface from drying out during the baking process.
Step 7
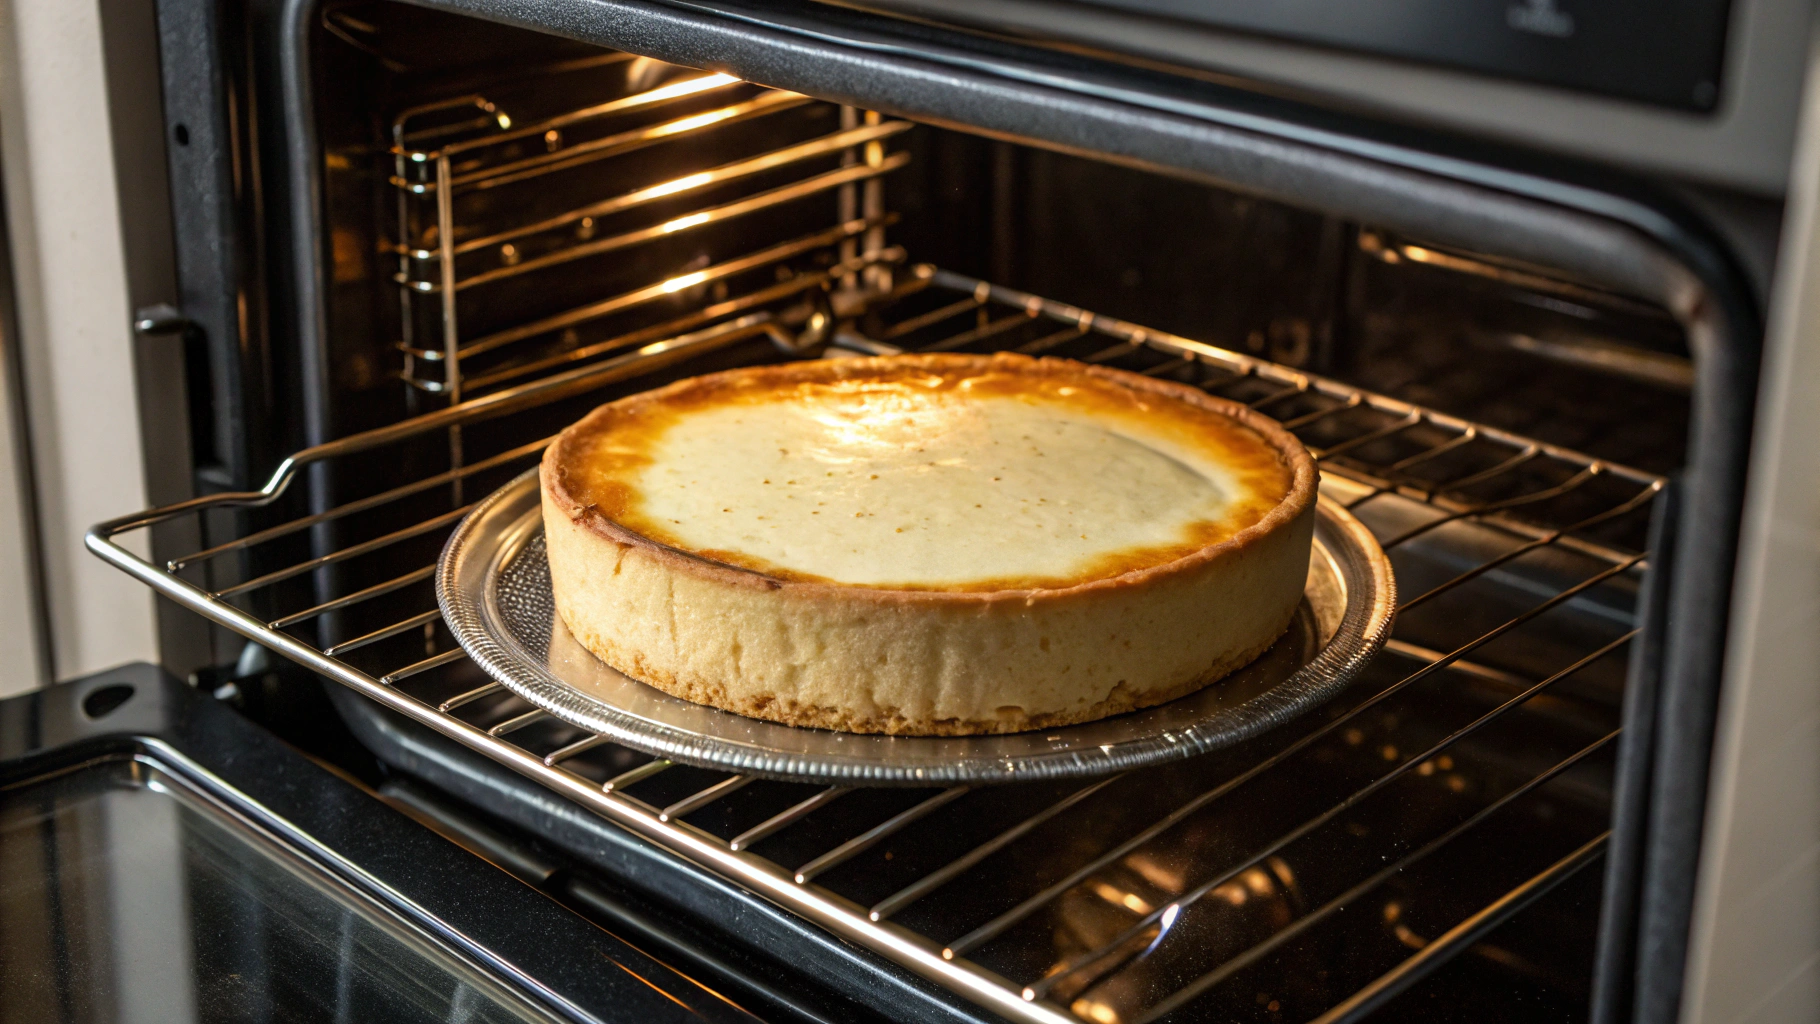
Baking Your Carnivore Cheesecake
Now for the moment of truth—baking your masterpiece to perfection!
- Place your cheesecake in the preheated oven (325°F/165°C)
- Bake for 40-45 minutes, keeping a watchful eye toward the end
- Look for the right doneness: The edges should be set, but the center should still have a slight jiggle to it—similar to the consistency of Jell-O
Important: Resist the urge to open the oven door during baking! This can cause sudden temperature drops that lead to cracks in your beautiful cheesecake surface. Instead, use your oven light to monitor progress.
Remember that the center should not be completely firm when you remove it from the oven. The residual heat will continue to cook the cheesecake as it cools, bringing it to the perfect consistency.
Step 8
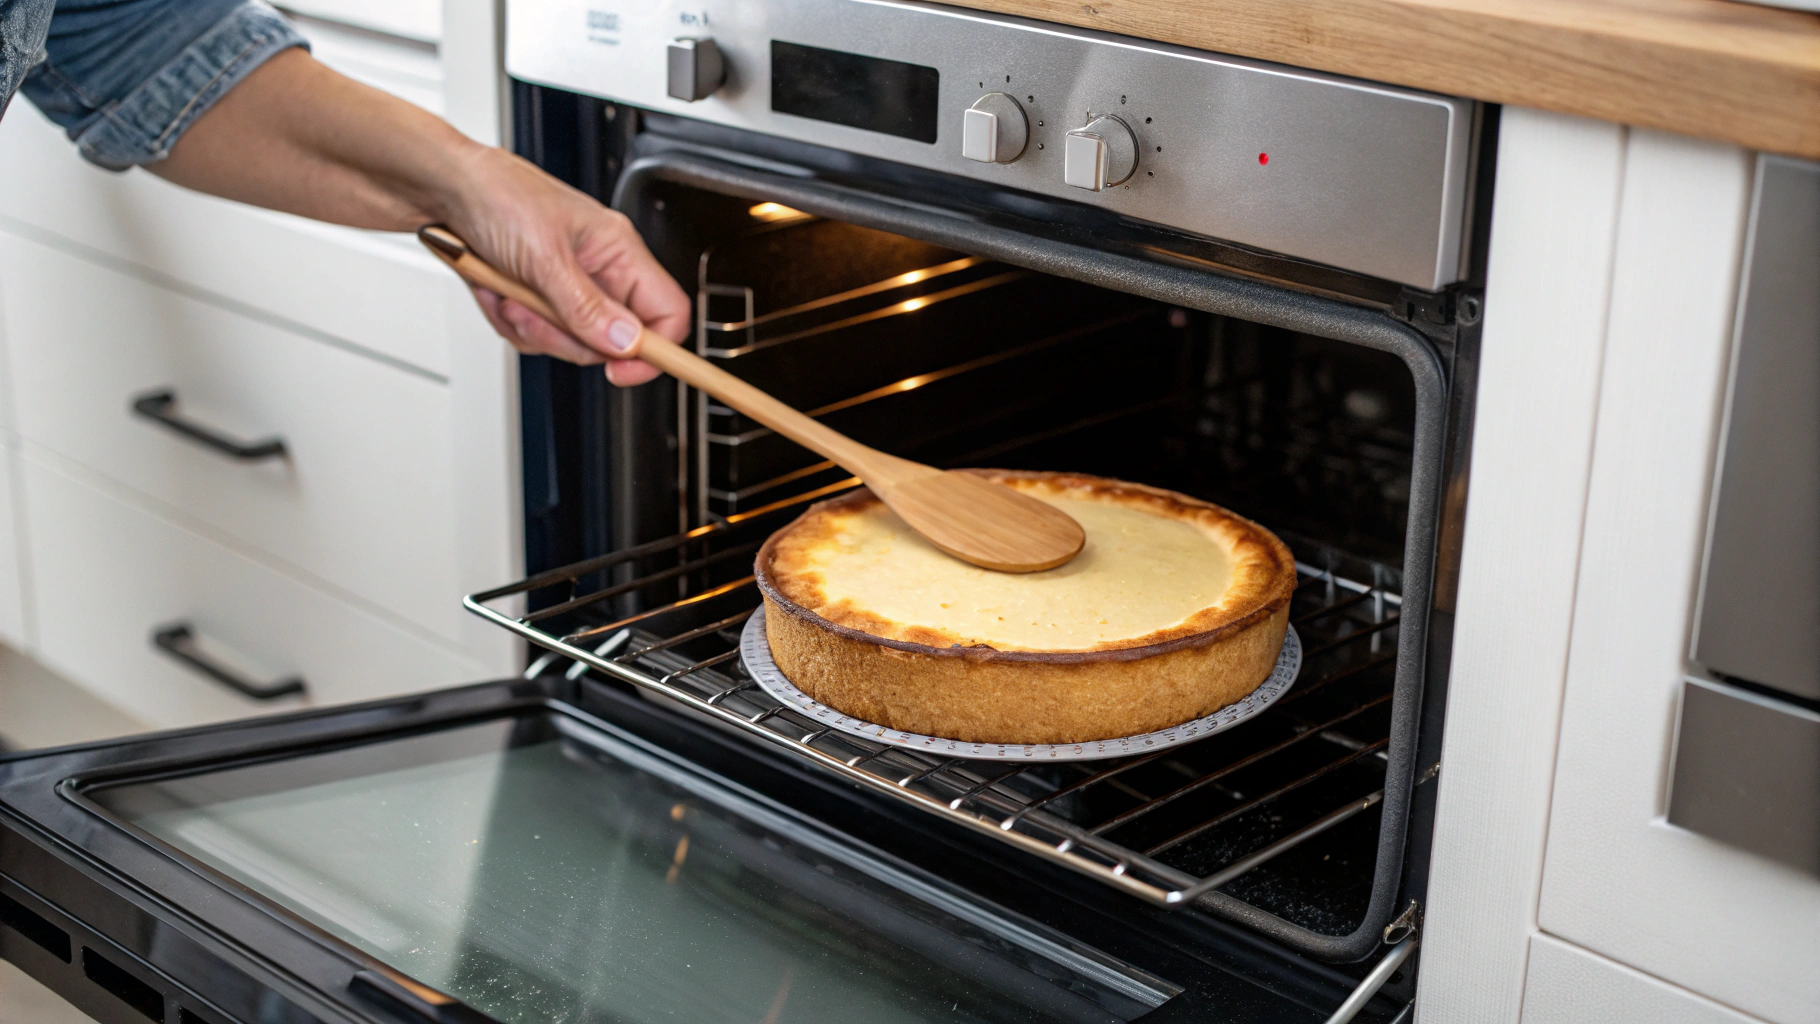
Step 8: The Art of Slow Cooling
Once your cheesecake has reached its baking completion time and has that slightly jiggly center, resist the urge to remove it from the oven immediately. Instead:
- Turn off the oven completely
- Crack the oven door open slightly (about 1-2 inches)
- Allow the cheesecake to cool gradually in the residual heat for 1 hour
Pro Tip: Use a wooden spoon to prop the oven door open just the right amount—simply place it between the door and the oven frame. This creates the perfect gap for gradual temperature reduction.
This slow cooling process is crucial for carnivore cheesecake success. The gradual temperature change prevents the formation of surface cracks that often happen with rapid cooling. During this hour, your cheesecake will continue to set while adjusting to room temperature at a controlled pace, preserving its smooth, velvety texture.
Step 9: Cooling Process
Cooling the Cheesecake
Once the oven time is complete, it’s time to begin the controlled cooling process:
-
Keep the oven door open: With the oven turned off and door slightly ajar, allow the cheesecake to cool gradually for about 1 hour.
-
Remove from water bath: Carefully lift the springform pan from the water bath, being cautious of hot water.
-
Remove foil wrapping: Gently peel away the aluminum foil from around the pan, checking for any moisture that may have seeped in.
-
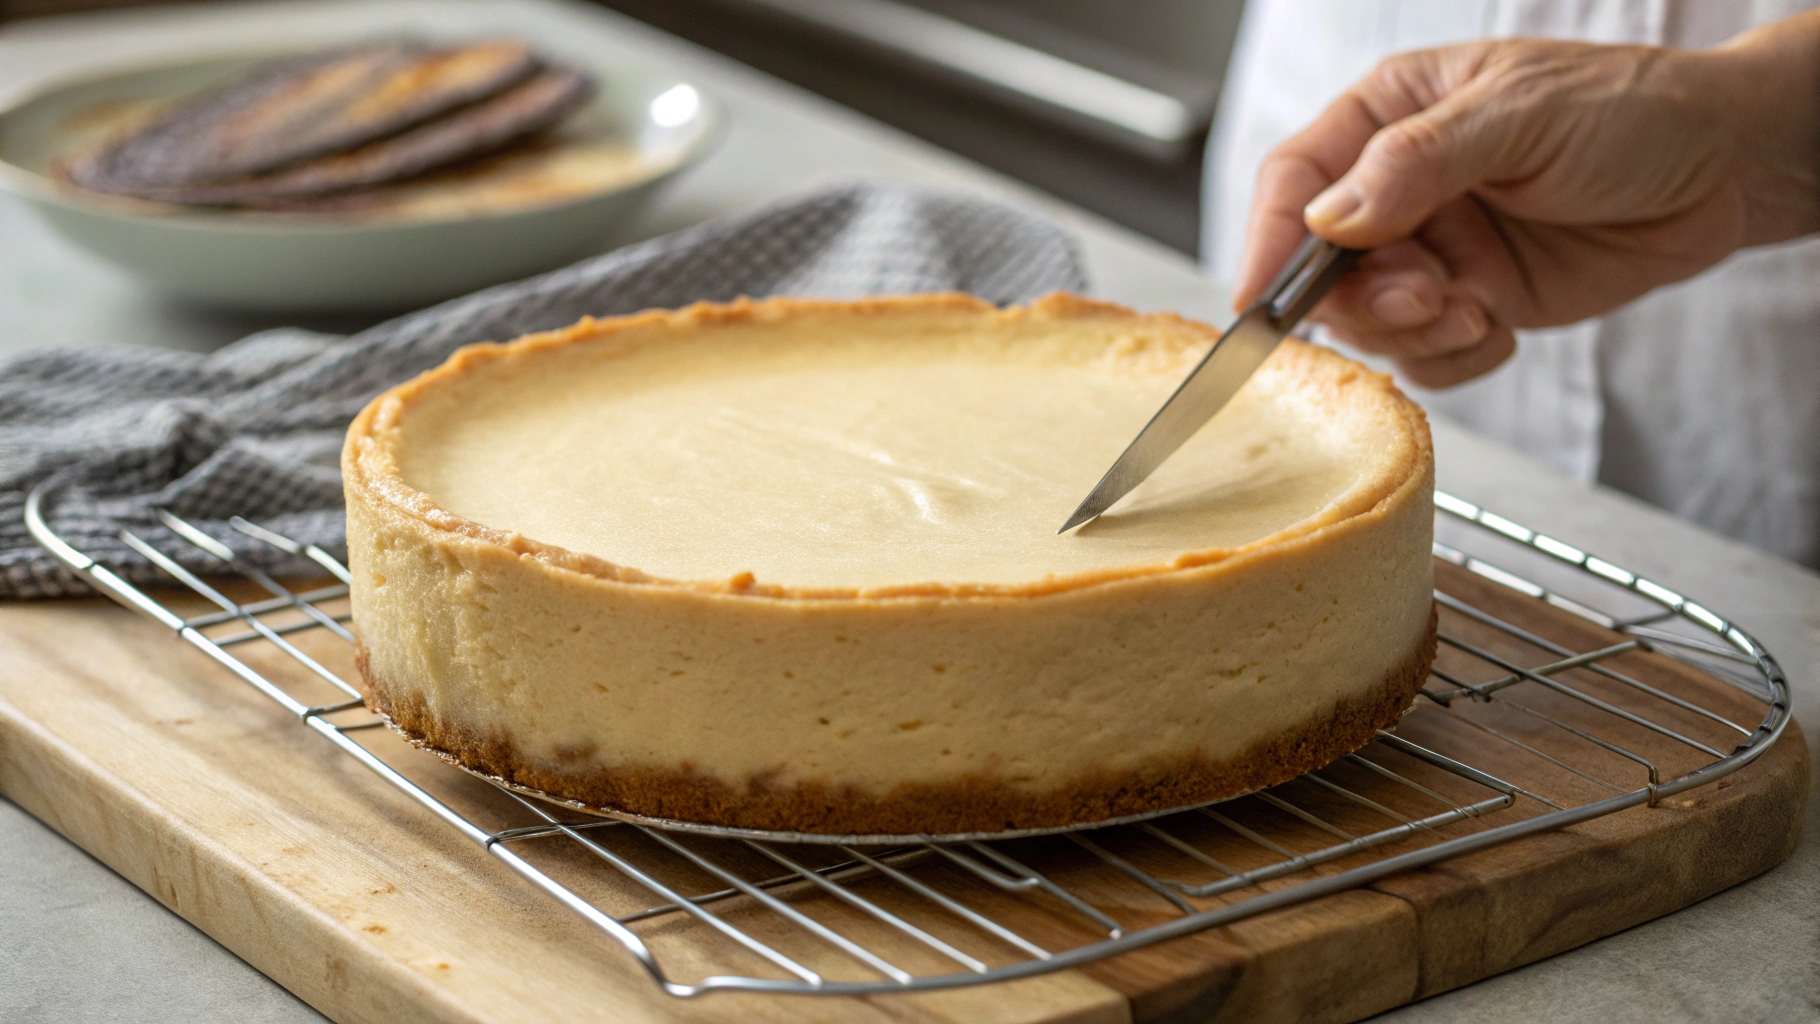
Edge release: Before removing the springform collar, run a thin knife or offset spatula around the edges of the cheesecake. This critical step prevents the cake from sticking to the sides and reduces the risk of cracks forming as the cake cools and contracts.
-
Final cooling: Place the cheesecake on a wire rack and allow it to cool completely at room temperature for approximately 2 hours.
Pro tip: Resist the urge to refrigerate the cheesecake before it has cooled to room temperature. The sudden temperature change can cause condensation on the surface and affect the texture of your keto-friendly dessert.
Step 10: Chill and Set
Step 10: Chill and Set
After your cheesecake has completely cooled to room temperature, it’s time for perhaps the most challenging part of the recipe—waiting! Cover your cheesecake with plastic wrap or aluminum foil, making sure it doesn’t touch the surface of the cake.
Refrigerate for at least 4 hours, preferably overnight. This resting period is absolutely crucial for three reasons:
- It allows the flavors to meld and intensify
- The texture firms up to that perfect creamy-yet-sliceable consistency
- The sugar-free sweeteners have time to fully incorporate without any cooling aftertaste
The patience required here will be rewarded with a dramatically improved flavor profile and texture.
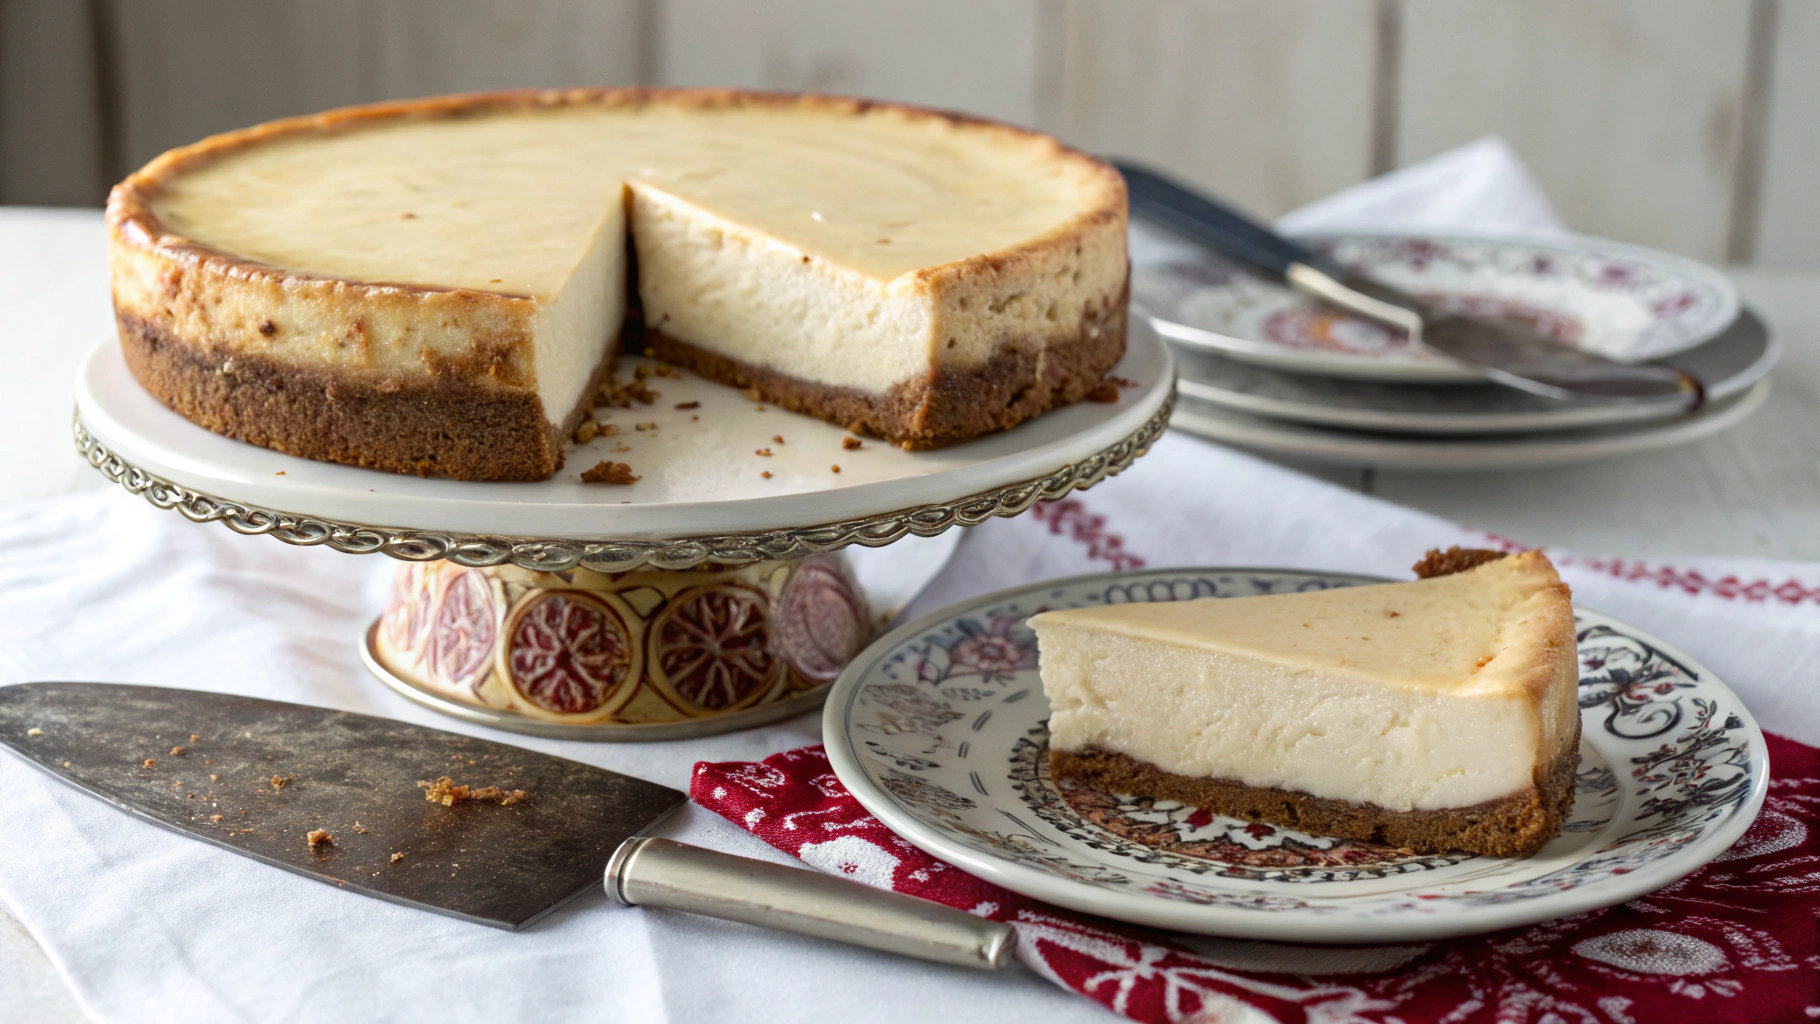
🔪 Serving Tip: For picture-perfect slices that would make any carnivore proud, dip a sharp knife in hot water and wipe it clean between each cut. This prevents the creamy filling from sticking to the blade and creates restaurant-quality presentation. Always serve your cheesecake chilled for the optimal taste and texture experience.
Storage and Make-Ahead Tips
This carnivore diet dessert keeps extremely well in the refrigerator for up to 5 days when stored in an airtight container. You can also freeze individual slices for up to 3 months – simply wrap each piece tightly in plastic wrap and then aluminum foil before freezing.
To thaw, place in the refrigerator overnight for the best texture. This makes it a perfect option for meal prep or when you want to have a carnivore-friendly treat on hand for occasional cravings.
Variations on This Simple Cheesecake Recipe
Dairy-Free Cheesecake Option
For those who can’t tolerate dairy but still want to enjoy a carnivore-friendly dessert, consider replacing the cream cheese with coconut cream (not strict carnivore) or a mixture of softened beef tallow and egg yolks for a unique savory-sweet custard.
No-Bake Cheesecake Alternative
If you prefer not to use the oven, try this no-bake version: omit the eggs and replace them with additional cream cheese and heavy cream, then chill in the refrigerator until set.
Festive Cheesecake Ideas
For special occasions, consider adding a topping of whipped heavy cream or a sprinkle of grated dark chocolate (for those following a more relaxed approach).
Savory Cheesecake Variation
For a truly unique carnivore experience, create a savory version by omitting any sweetener and adding herbs, bone marrow, and a touch of liver pâté for a rich appetizer.
Why This Healthy Cheesecake Works for Special Diets
This versatile cheesecake recipe isn’t just for the carnivore diet – it’s also perfect for:
- Keto dieters: With its high fat content and minimal carbs, this keto cheesecake recipe fits perfectly into ketogenic macros.
- Low-carb enthusiasts: As a sugar-free and grain-free option, this low carb dessert satisfies without the carbohydrate load.
- Gluten-free individuals: Naturally gluten-free with no substitutions needed.
- Sugar-free lifestyles: Contains no added sugars unless you opt for the honey variation.
If you enjoy this carnivore cheesecake recipe, you might also like our Slow Cooker Beef Chuck Roast Recipe for a savory carnivore-friendly main dish.
Now, let’s dive into the step-by-step instructions for creating this decadent treat!